Solar Water Preheater Goals & Design Considerations
Friends on Mastodon will know that I'm working on sort of a thermal battery for our house. Let me explain…
I've been thinking a lot lately about solar energy. It's "free," after all! Batteries capable of storing tens of kilowatt-hours of energy, though, are relatively costly. Some amount of our house's energy bill, though, is for heating water (we have a 40-gallon, 4800-watt water heater in the basement). In theory I should be able to store solar energy as heat and then use it directly, bypassing the battery part of a conceptual solar energy system altogether.
At a high level, my idea: an 800-watt array of solar panels on the roof will generate electricity, and I'll use that electricity to heat a heavily-insulated, 55-gallon drum of water in the basement to near-boiling. The drum will be not only a thermal battery but also a heat exchanger; water will flow through ~65 feet of copper & stainless steel piping in this drum on its way to the house's grid-powered electric water heater.
This post will discuss the considerations and tradeoffs that led me to this design for the system. Look for future posts covering the build of various parts of this system, hopefully including some photos.
Simplicity & Reliability
A primary goal is simplicity. I want to produce a system that is simple to build, simple to install, and simple to operate over a wide range of environmental conditions.
Once set up, it should Just Work, with zero human interaction, no matter the season. It should require no maintenance. It should alert me if something has gone wrong. It should never make the grid-connected water heater expend more energy than it normally would.
This project should introduce as little risk as possible. This means it should add no safety hazard to the house, and it should increase the risk of water leaking in the basement as little as possible. (I'm already unhappy with the risk posed by a pressurized 40-gallon water heater tank, and perhaps one day I will replace it by a tankless water heater.)
PV Panels vs. Solar Thermal
Early in the planning for this project, I considered collecting thermal energy directly. This would be done with a solar thermal collector; there are DIY and commercial options.
Unfortunately, based on my online research, I concluded that even the best of these panels won't collect much heat energy at all in the winter here in Michigan.
I'd also have to plumb insulated fluid lines from the basement up to the roof, which is a decidedly more complex and error-prone thing to accomplish than running a single pair of wires. (The result would be uglier, too.)
Maintaining a tank of water with a target of 200°F would be a challenge with a direct thermal capture system, since I doubt the thermal capture fluid itself isn't actually going to get that hot (especially in winter). I think I'd need some sort of heat pump to actively move heat energy from the fluid to the thermal battery, and that's another layer of complexity and expense.
So I concluded that, even though PV solar panels are maybe 25% efficient in the absolute best case, they're still a better option for this project.
Water as Heat Storage
I first considered using sand as my heat storage medium. Water, though, can store a lot more thermal energy in the same volume, at the same temperature.
That phrase "at the same temperature" is doing a lot of work, though! You can heat sand up way hotter than you can water, because at some point the water starts to boil away. I decided, though, that I'd rather have a tank of 200°F water in my basement than a tank of much-hotter sand. Dealing with much higher temperatures starts to feel dangerous, and there are materials limits to take into account. How much heat can the internal pipes withstand? What about the solder joining those pipes together? Will the pipes connecting the thermal battery to the house's plumbing conduct too much heat out to the adjacent Pex couplings? What coating will you use to protect the steel drum from rust that can withstand 400º+ temperatures? You get the idea. 200°F is already hot enough that there are limits: Pex is only rated for drinking water up to 180°F, and many epoxies are not rated to withstand anywhere near that temperature.
With heating elements placed at the bottom of the drum, hot water will tend to rise, and cooler water will fall back down to the heaters. This nice natural circulation should help keep the top and bottom of the tank at a relatively consistent temperature. This wouldn't happen with sand.
Finally, I will have to physically move this thing! I have no idea how I would move a 55-gallon drum of sand into a basement corner, and should I ever need to uninstall it, this becomes an even bigger challenge. 55 gallons of water will weigh well over 400 pounds, but even a cheap submersible utility pump can relocate that much water in a couple minutes.
Heat Exchanger vs. Secondary Tank
It would be possible to make essentially a secondary conventional water heater tank, either by fabricating it myself or by modifying an off-the-shelf water heater to run on DC power. Ultimately I decided not to go this route for a few reasons:
First, building a large tank intended to store pressure is challenging and comes with risks. A controller malfunction that allows water to overheat could lead to a catastrophic failure, and even a small construction flaw will eventually result in a leak. I'm not that confident in my welding or brazing skills.
When I started this project, I was also put off by the cost of buying a water heater tank and modifying it to work with several smaller, DC heating elements. (In retrospect, given the significantly higher than expected overall cost of building a good heat exchanger — including copper pipes, stainless steel coils, and silver-bearing solder — "cost" was not a good reason to go with the heat exchanger design!)
Finally, I don't believe an off-the-shelf water heater tank is intended to store water at 200°F. While I imagine it would probably be okay, I don't want to operate a pressurized tank outside of its intended operating specs. And even if the tank is, mechanically, okay, I don't know that the insulation and other components would be affected by higher-than-intended temperatures. I would have to run an off-the-shelf water heater tank at a lower temperature than my heat-exchanger design, significantly lowering the system's energy storage capacity.
Heat Exchanger Design
My very first idea was to build a heat exchanger from copper pipe, either coiled or in a densely-arranged vertical configuration. Then I looked at the price of copper pipe and tubing.
Then I tried using Pex plastic pipe. My thought process here was: this stuff will have terrible thermal conductivity compared to copper, but they use it for underfloor heating and even some geothermal applications, so maybe it'll work here; I just need to get a long enough length of Pex coiled inside the drum.
That didn't work. Pex is nowhere near as flexible as I had hoped, and coiling it tightly inside the drum was somewhere between "hard" and "impossible."
My friend Sam suggested looking at "wort cooler" coils used by homebrewers. These are stainless steel coils intended for use in heat exchange applications. Unfortunately, most of these have small diameters (around half an inch), which wouldn't work for a part of a house's plumbing.
Fortunately, I eventually found a coil with 1" outer diameter that would work! Unfortunately, it was costly (around $150), and I needed to buy three to make a heat exchange coil that almost fills the available space in the drum.
This heat exchanger build is a project in and of itself, and describing it in detail will be a blog post all on its own. Some highlights: I ended up 3D-printing spacers to keep the coil pipes from touching and allow water to flow between them, and I learned that connecting stainless steel to copper is quite challenging for someone with beginner-level welding/brazing/plumbing skills.
Maximizing PV Panel Power Production
PV solar panels can be connected directly to a load, but to extract optimal performance the load needs to vary its power consumption to stay near the panel's maximum power point. (This is what MPPT solar chargers do.)
For this project, I don't want or need to have an electrical battery in the system, but if I just naively connect 800W of heating elements to a solar panel array, I'll get effectively zero heat output unless it's a perfectly clear and sunny day.
The PV array, with a maximum output of around 50V, will connect directly to a DC-DC buck converter that outputs 12 volts. That should allow me to draw a consistent 12V as long as the panels are producing even a little power.
I've designed a PCB that will take 12V input and distribute it to 8x 100-watt heating elements. This control board will sense the voltage coming from the solar panel array and connect heating elements until the PV voltage hits the panel's optimal voltage, and it will disconnect heating elements if the PV voltage drops too far below optimal. This should — I hope — allow me to extract reasonably good performance from the panels while avoiding the need for an electrical battery and MPPT charger.
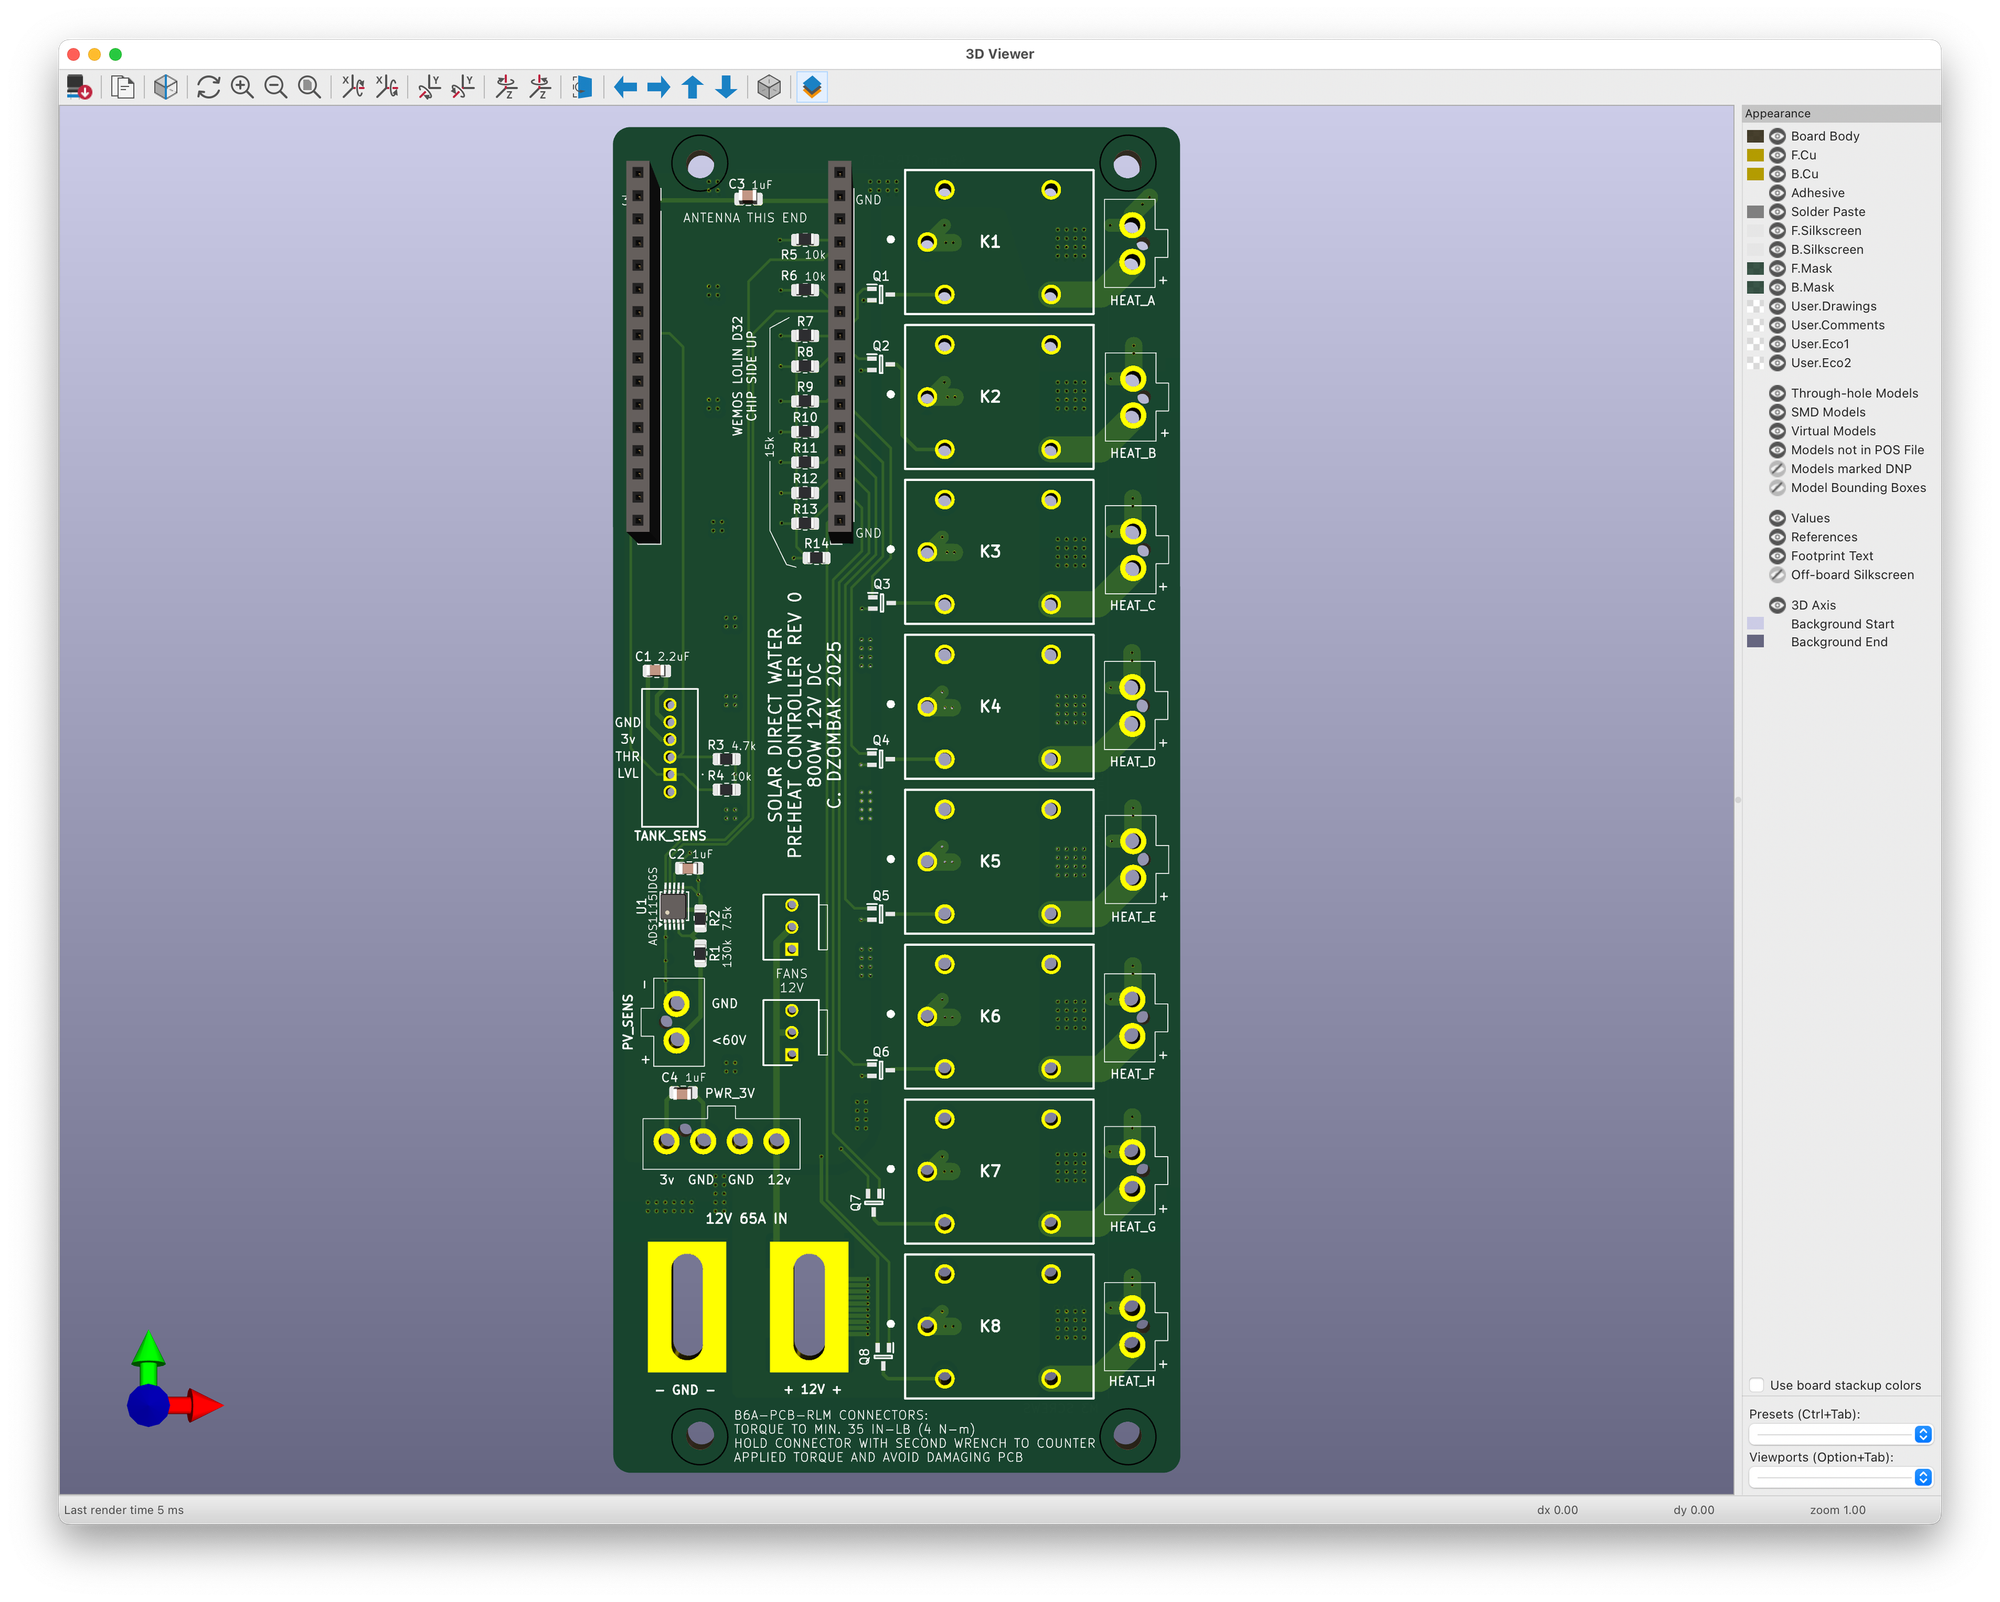

Solar Water Preheater PCB preview in KiCAD
Control & Monitoring
The control board will have an ESP32 processor, and it will have a few tasks in addition to controlling heating elements based on PV output voltage:
Temperature control: a thermometer inside the tank will measure water temperature, and the control board will use this sensor to keep the water temperature at 200°F.
Water level sensor: for safety, the tank will have a water level sensor installed near the top. If water drops below this level, the control board will shut off all heat until the tank is refilled.
Monitoring: Finally, the ESP32 board will also report key statistics via MQTT: PV voltage, tank temperature, water level sensor state, and the number of heating elements running. These will get ingested into my local InfluxDB instance and displayed in Grafana.
Voltage & Heater Selection
I originally thought this project would simply connect some heating elements directly to an array of solar panels wired in parallel, so I settled on 12-volt heating elements. This was not a good plan for many reasons:
- It would extract poor performance from the panels, as discussed above
- Nominally "12 volt" panels do not actually produce 12 volts
- 800 watts at 12 volts is ~65 amps of current, requiring me to run 6-gauge or heavier wire to the roof 💸
The 8, 100-watt 12-volt heating elements will allow the control board to fine tune the system's load pretty well, staying close to the panels' maximum power point. That's an advantage. The disadvantage is that wiring between the control board and the DC-DC buck converter powering the whole system needs to be able to handle 65 amps, as does the control board itself. This is a design challenge for the control PCB; it requires extremely wide traces and heavier-than-normal copper, and thus increases cost. It's a physical challenge too; connecting 6-gauge wire to a PCB is not trivial.
In retrospect I wish I had chosen 24V for the system's operating voltage, since that would cut my current-handling requirement in half, but by the time I realized this I was already too far down the 12-volt path. Alas.
Insulation
The thermal battery/heat exchange drum will be surrounded by a layer of conventional paper-backed R19 fiberglass insulation. An initial test with a thermal imaging camera tells me that this will work well, with the caveat that any gaps will become significant sources of energy loss, so I need to do a good job with the insulation in the final installation.
I want the top of the drum to remain removable for maintenance, so I'll make a circular tight-fitting "lid" for the whole system out of a couple layers of foam board insulation. This should seal well enough to prevent significant heat loss while still allowing me to simply lift it off when needed.
Sealing the lid on the top of the drum is a design challenge. I want a very good seal, because escaping water vapor will waste stored energy and encourage mold growth on the insulation outside the tank. At the same time I don't want or need the drum to hold a significant amount of pressure. I think the solution here is to carefully seal the holes in the top of the drum (necessary for the UV light and thermometer wires) with good silicone caulk, and then seal the lid onto the tank with some sort of quality waterproof tape (Flex tape?) that I can remove or cut through if/when necessary.
Finally, the pipe leading from the thermal battery/heat exchanger to the electric water heater will be well-insulated.
Sanitization
Barring a significant plumbing failure, the energy-storage water will never mix with water flowing through the heat exchanger. Regardless, I do not want a tank of bacteria sitting in the basement! A temperature of 200°F will kill most bacteria, but especially during cloudy periods this drum will likely be sitting at a dangerous temperature: warm enough for things to happily grow in it; cool enough not to kill them.
Chlorine and bromine, commonly used to sanitize pools and spas, can corrode copper and steel over time, so I can't use them for this project.
I plan to address this by installing a UVC sanitization light inside the tank. These are commonly used to sanitize aquariums and kill algae in ponds, and metals are generally unaffected by UV light.
The light will be powered by a Sonoff smart plug running ESPHome, so I can schedule it to run for an hour or two daily. This particular plug also allows monitoring power consumption, and I'll use this feature to trigger an alert if the UV lamp dies and needs to be replaced.
Rust
Of course, given that the 55-gallon drum is made of steel, rust is a concern. The drum has some sort of pretty robust protective coating, but it's scratched in spots and has been scraped or burned off around the spots where I've brazed fittings onto/through it.
My first plan was to use simple Rust-oleum enamel spray paint. I'll still do this for scrapes on the outside of the drum (after cleaning the rust off with a wire brush), but I worry about achieving good coverage on the inside of the drum, especially on the bottom.
I also considered using epoxy to coat the bottom. The advantage here is that I could, hopefully, pour a thin layer of epoxy on the bottom of the drum and let it cure. But epoxies I looked at are not intended to withstand 200°F.
The plan I've settled on is to use POR-15 to clean, prep and coat the bottom of the drum, both inside and outside. I'll also use this on any internal areas where I scratched or burned the factory coating. For small exterior blemishes that aren't going to be exposed directly to water I'll just use enamel spray paint.
I may also install some sort of sacrificial anode inside the tank, like in off-the-shelf water heaters. I haven't planned how this will be mounted yet, though. The obvious approach is to mount it on the drum's lid, but the lid probably won't have a great electrical connection to the rest of the drum. Mounting it on the bottom would work, but replacing it would require draining the tank and disconnecting it from the house's plumbing. Mounting it in the side of the drum will probably work best, even if it means I can't use an anode rod which would protrude into the heat exchange coils. Zinc anodes for boats & ships are available in a wide assortment of shapes and sizes, so I'll probably end up with one or two of those.
Theoretical Performance
Let's make two assumptions:
- The drum, once completed, will contain 50 gallons of water at a maximum of 200°F
- Water coming into the house is at 50°F
In theory, then, this thermal energy storage system can store up to 18.34 kWh of energy. This is roughly equivalent to between 3 and 4 of these $900, 5.12 kWh LFP batteries (which would likely be my choice for storing electrical energy from solar). That's pretty good! This project definitely cost less than 4 of those batteries.
I haven't finished assembling the latest revision of this heat exchanger, so I don't know how well it'll perform. In theory, my grid-connected electric water heater would consume 18.34 kWh in roughly 4 hours, but we can assume this system will not completely prevent the water heater from needing to work (unless the heat exchanger massively outperforms my expectations and can actually heat water to ~125°F as it flows through!).
Realistically, and choosing completely arbitrary success criteria, I would be very happy if this system cut our water-heating bill in half. That would mean that with a thermal battery water temperature of, say, 150°F, it would need to heat incoming water by around 35~40ºF (from 50°F to around 85°F). That feels achievable, I think?
Later today a package should arrive with the aggressive flux and 45% silver solder that's apparently necessary to solder copper to stainless steel, so I should be able to construct the bulk of this heat exchanger in the very near future. My next task will be to measure its performance.
Possible Future Improvements
One idea I'd like to explore, depending on heat exchanger performance, is to replace the tank's water by a mixture of propylene glycol and water. Depending on the ratio of water to PPG, this could increase the solution's boiling point and therefore increase the thermal storage capacity of the tank.
To achieve a substantially higher boiling point, though, the mixture would need to be majority-PPG. This would be costly; based on a quick search it looks like a 55-gallon drum of the stuff runs around $600-700.
Another issue is that PPG has a lower specific heat than water, so this quickly becomes a problem to be addressed with a spreadsheet, exploring the optimal tradeoff between cost, thermal capacity, and temperature.